Urad Dhal Vada is a scrumptious snack recipe which can be enjoyed for breakfast with coconut or onion chutney. Ulundu Vadai is also called as ‘Medu Vadai’. It is a famous southindian recipe prepared during festival times, pot luck, special occasions. The main ingredient of this Vada is ‘Urad Dhal’ which is highly rich in iron and protein. Vadai can be prepared with both white or black urad dhal. Today I prepared Vada using white urad dhal.
Ingredients: 1 cup – Urad Dhal, asafoetida – 3 tablespoon, finely chopped onion -1, curry leaf – handful, oil to fry, salt to taste
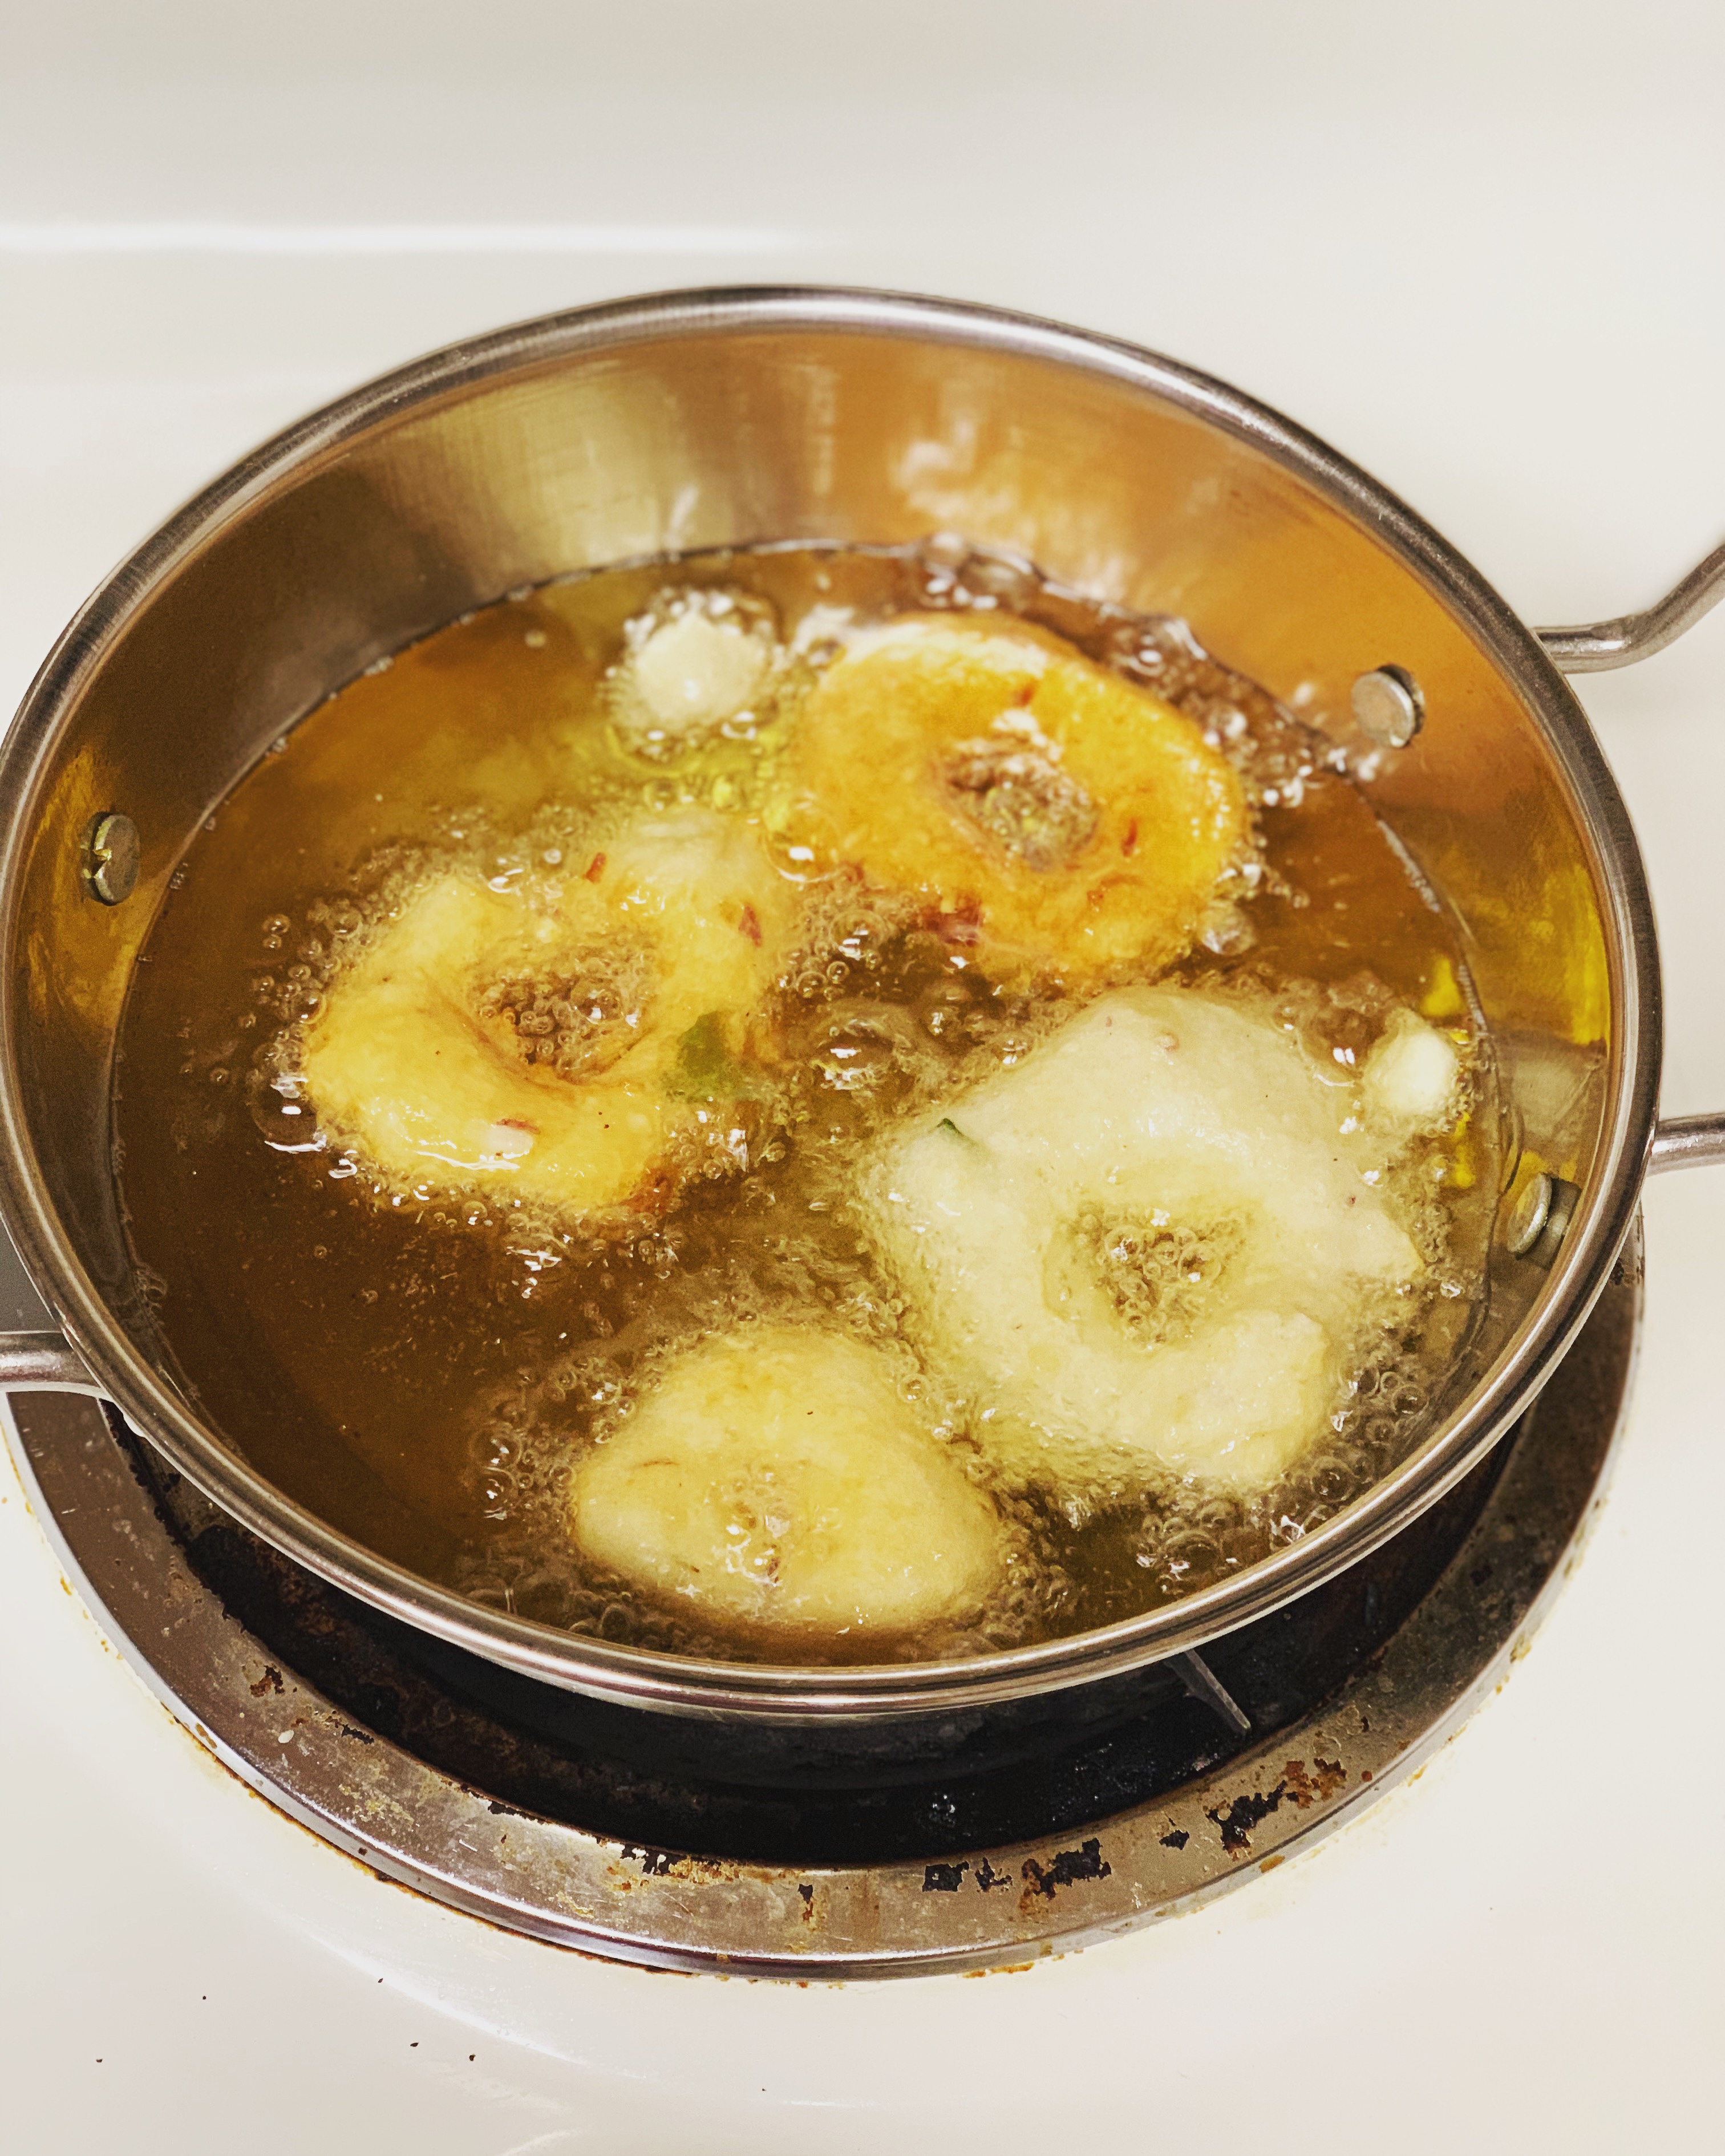
How to make urad dhal vadai| 1. To make urad dhal Vada, first and foremost step would be soak the urad dhal in water for atleast 2 hours of time. 2. Drain the water completely and grind it. In a grinder jar, add the soaked dhal and prepare the batter. 3. Grind the batter in a thick consistency using little water. 4. Transfer the grinded batter to a large bowl and add salt, asafoetida, chopped onion, green chillies. Mix well and the batter is ready to make vadai balls and fry. 5. Meanwhile, heat a pan and add oil. In a hot oil, start frying the vadai. 6. Take some batter in your hand and make a circular shaped Vada. You can use little water to make the Vada. Flatten the vadas with your hands and make the hole in the middle of the vada. 7. Carefully, add these vadas in hot oil, deep fry the Vada. Turn the Vada back and front and allow the Vada to cook well until it turns golden brown color. Once prepared, you can place the vadas in the absorbent paper tissues to absorb the extra oil. It’s ready to serve now !!
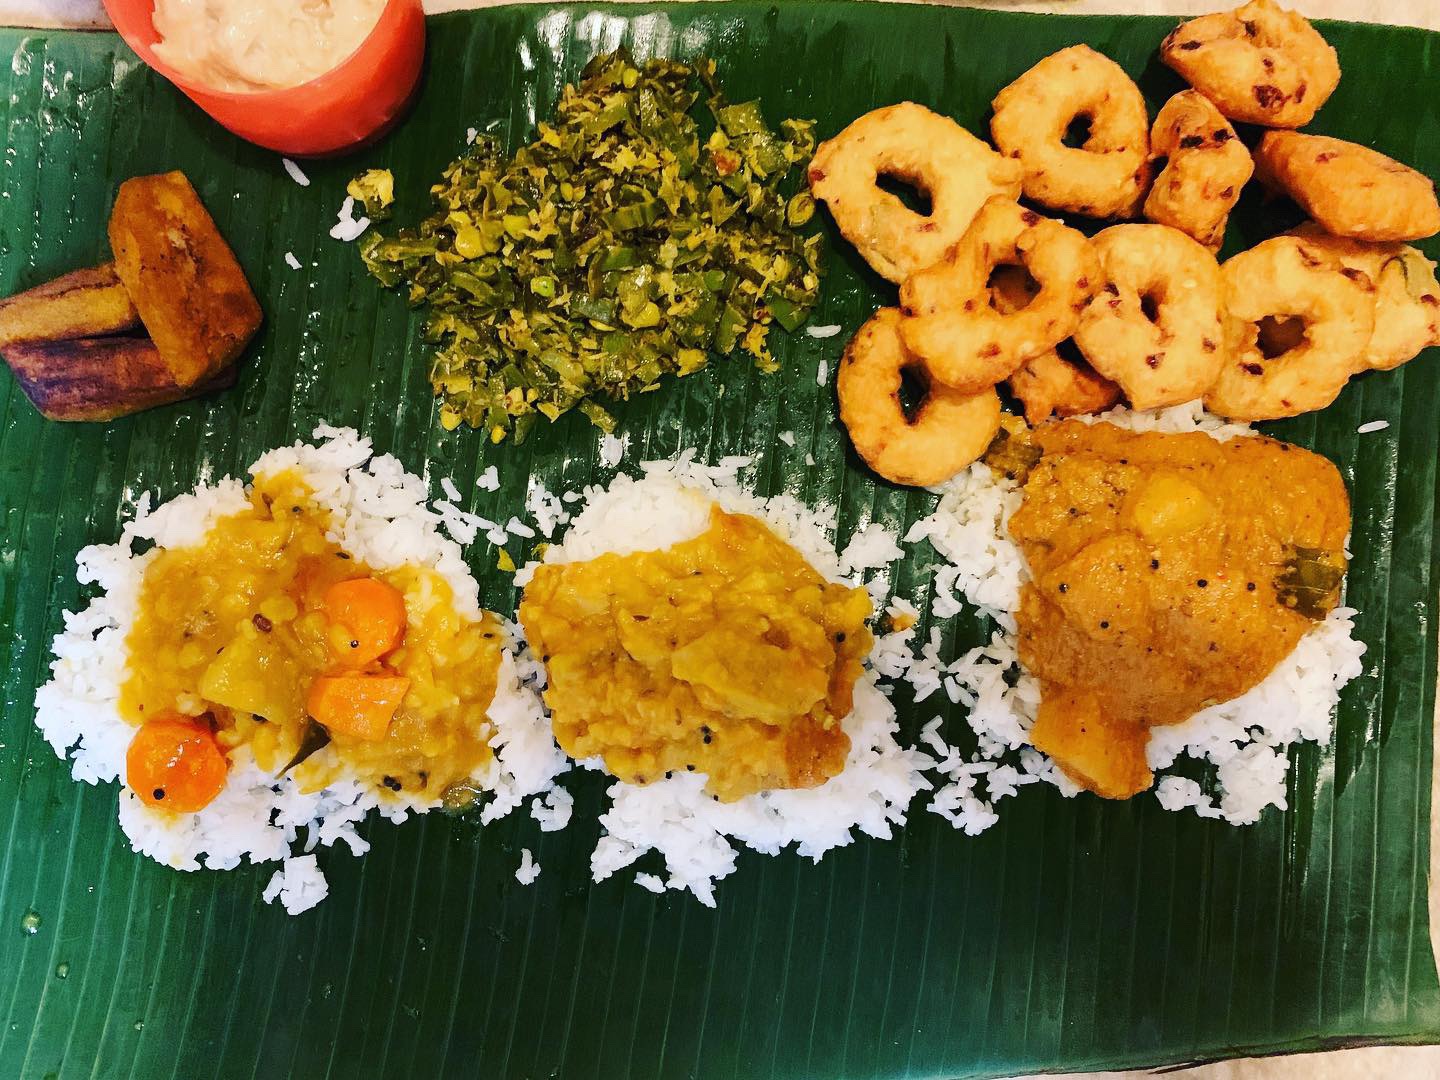
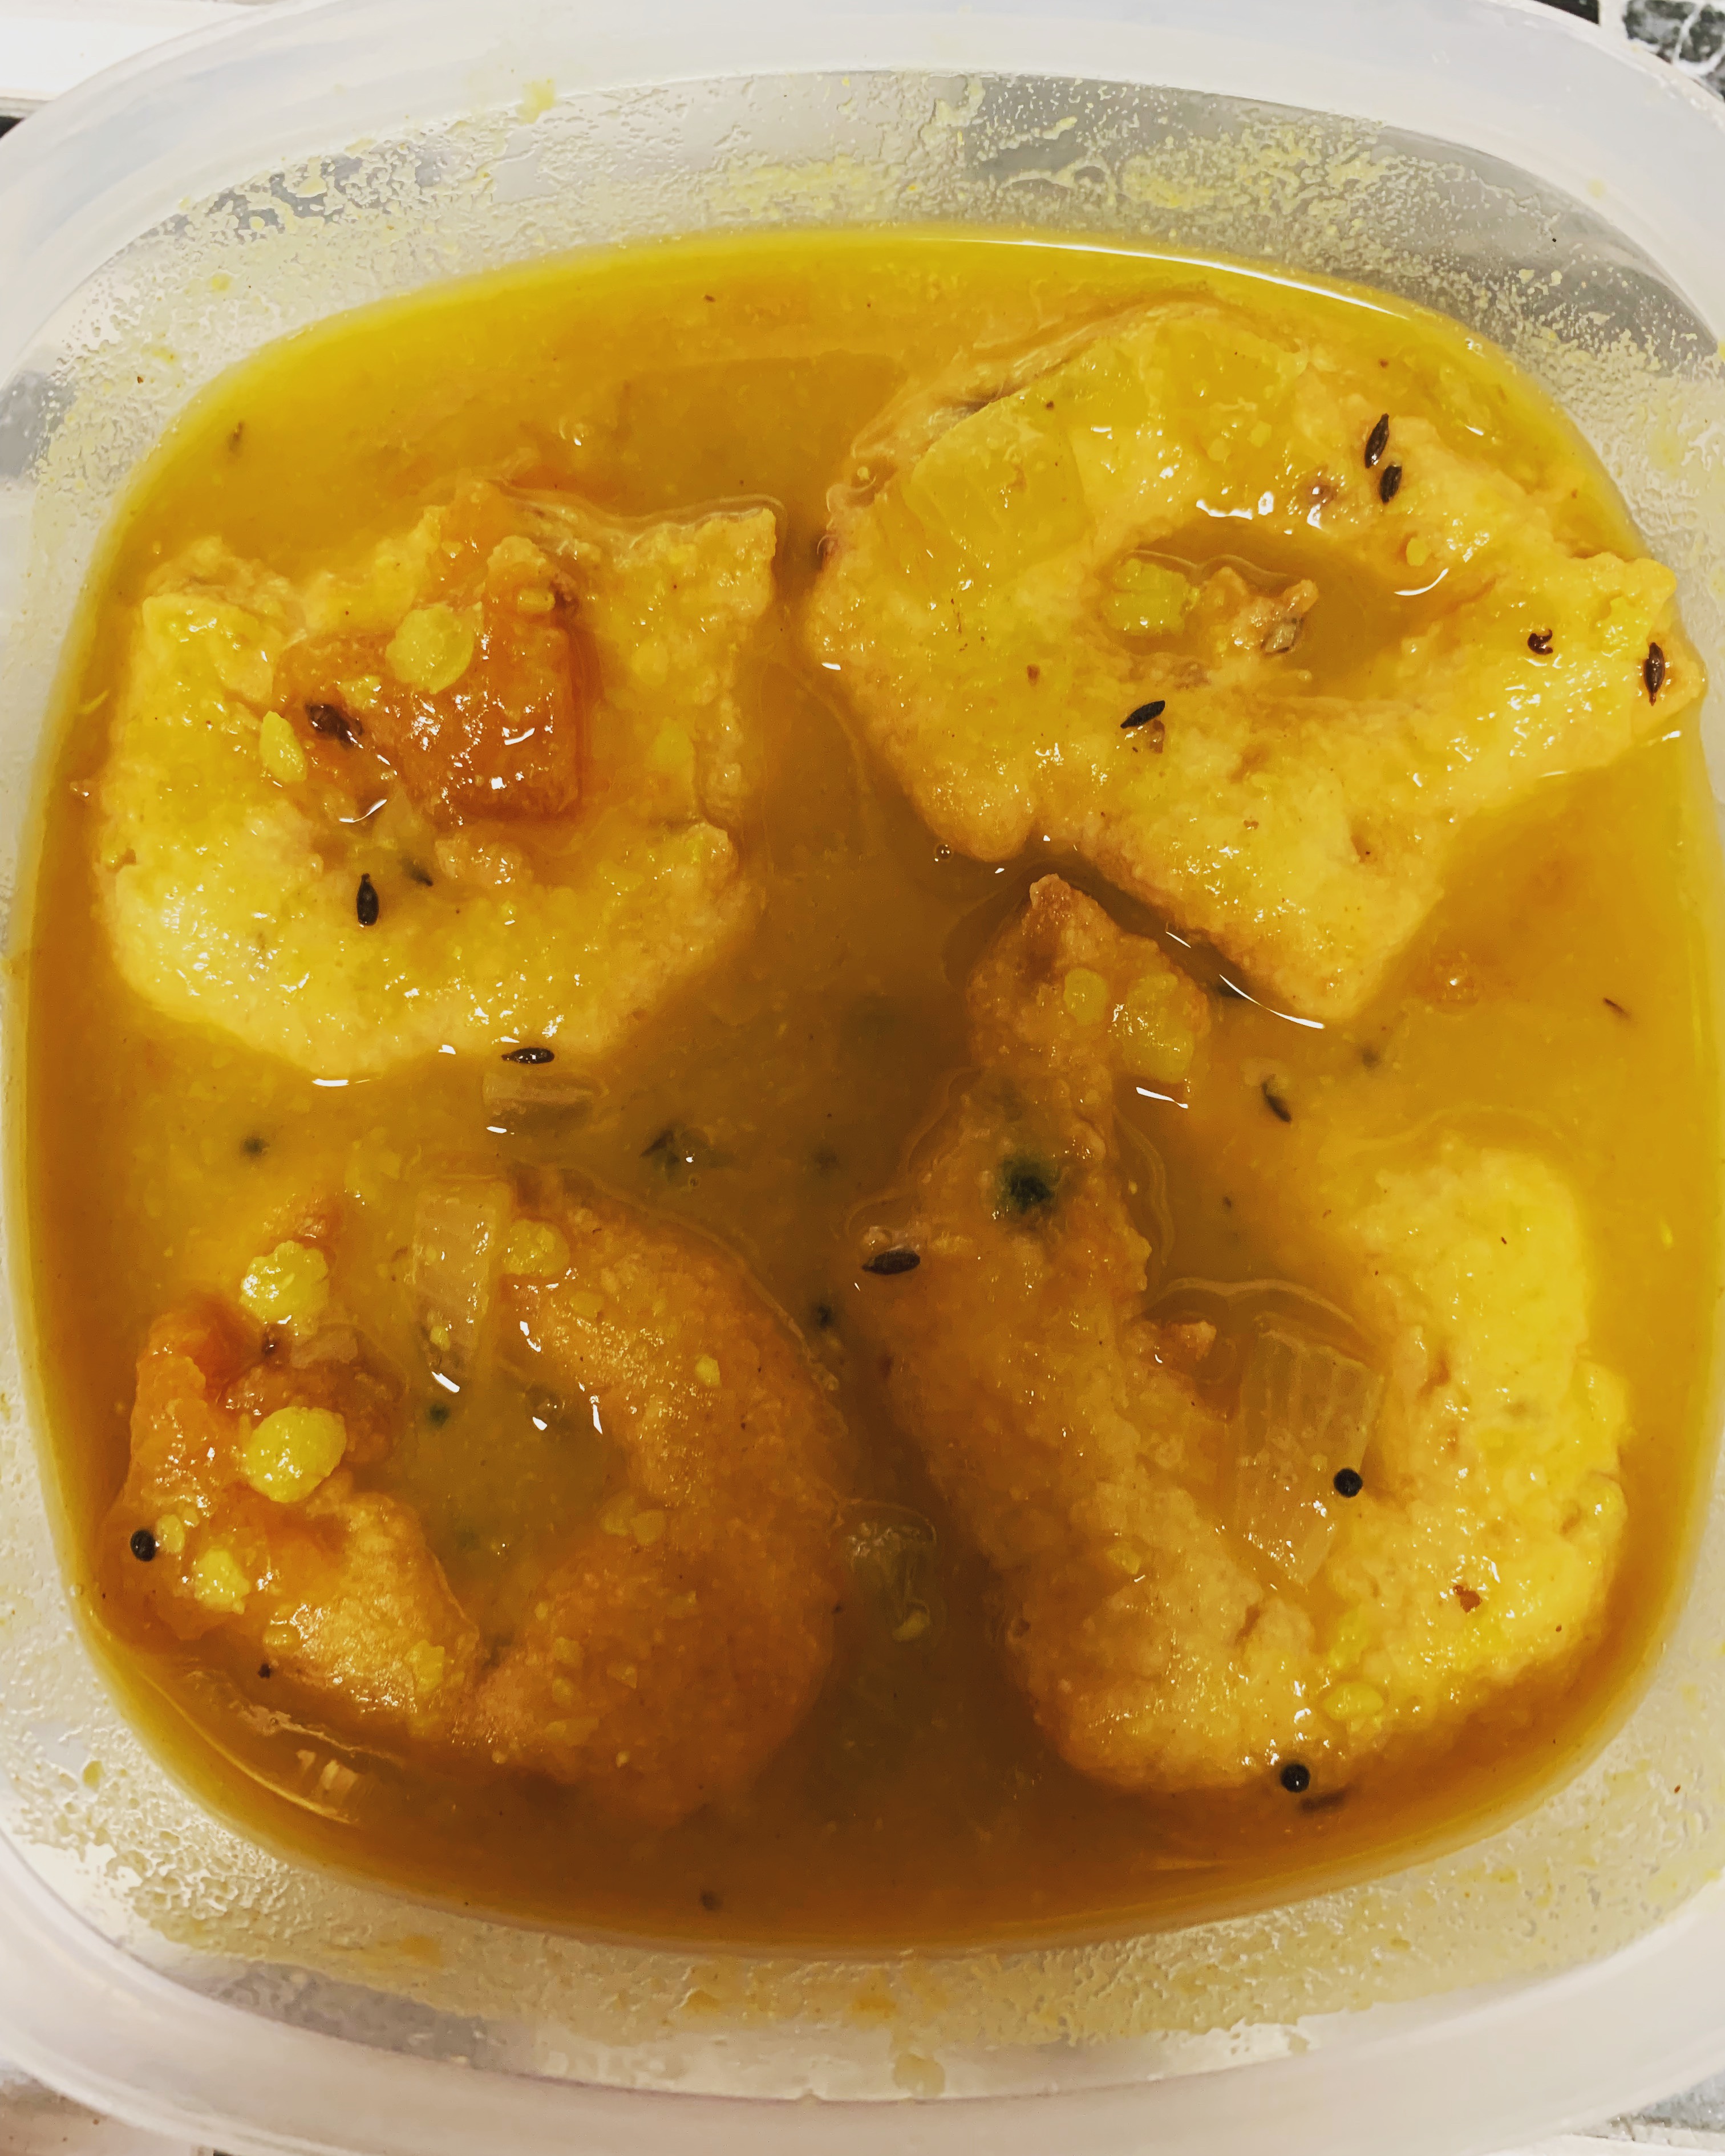
You can add the vadas, ‘Sambar’ for Sambar Vadai. In ‘Curd’ for Thayir Vadai. In ‘Rasam’ for Rasa Vadai. It can be served as plain vadai as well with side dish tomato or onion or coconut chutney!!
Notes: 1. Soak the urad dhal in water to of 2 hours to up to 4-5hours. The more time the dhal gets soaked in water it makes the dhal grind easily. 2. Don’t add more water while grinding the batter. Thick consistency is important. 3. Fry the vadas in medium flame so that the Vada gets cooked well inside as well as it turns golden brown outside!
A basic South Indian breakfast recipe made with semolina, spices and veggies. It is the most easiest and quickest breakfast recipe which can be prepared in 20 minutes of time.
If you are new to cooking or bachelor trying to cook for yourself with minimum effort then upma is a must try. It is tasty, nutrient and will be ready in no time. It is prepared in South Indian homes, tiffin centers, weddings and also in religious centers. It goes well with chutney varieties and any other gravies. Children can be feeded with sugar. I used to eat upma with sugar during my childhood days.
Ingredients: 1 cup semolina or rava or sooji
Onion – 1
Tomato – 1
Green chilly – 4 (If you have carrot, green peas you can add them) I have not used veggies today.
Thalipu Ingredients: Mustard seed, jeera, asafoetida, curry leaf, oil, ghee and salt to taste
Instructions: Preparation for upma 1. Dry roast rava in low or medium heat until crunchy. 2. Do not brown the rava as it changes the flavors of rava. 3. Chop the onion, tomato, green chillies and other veggies 4. Keep the Thalipu ingredients ready.
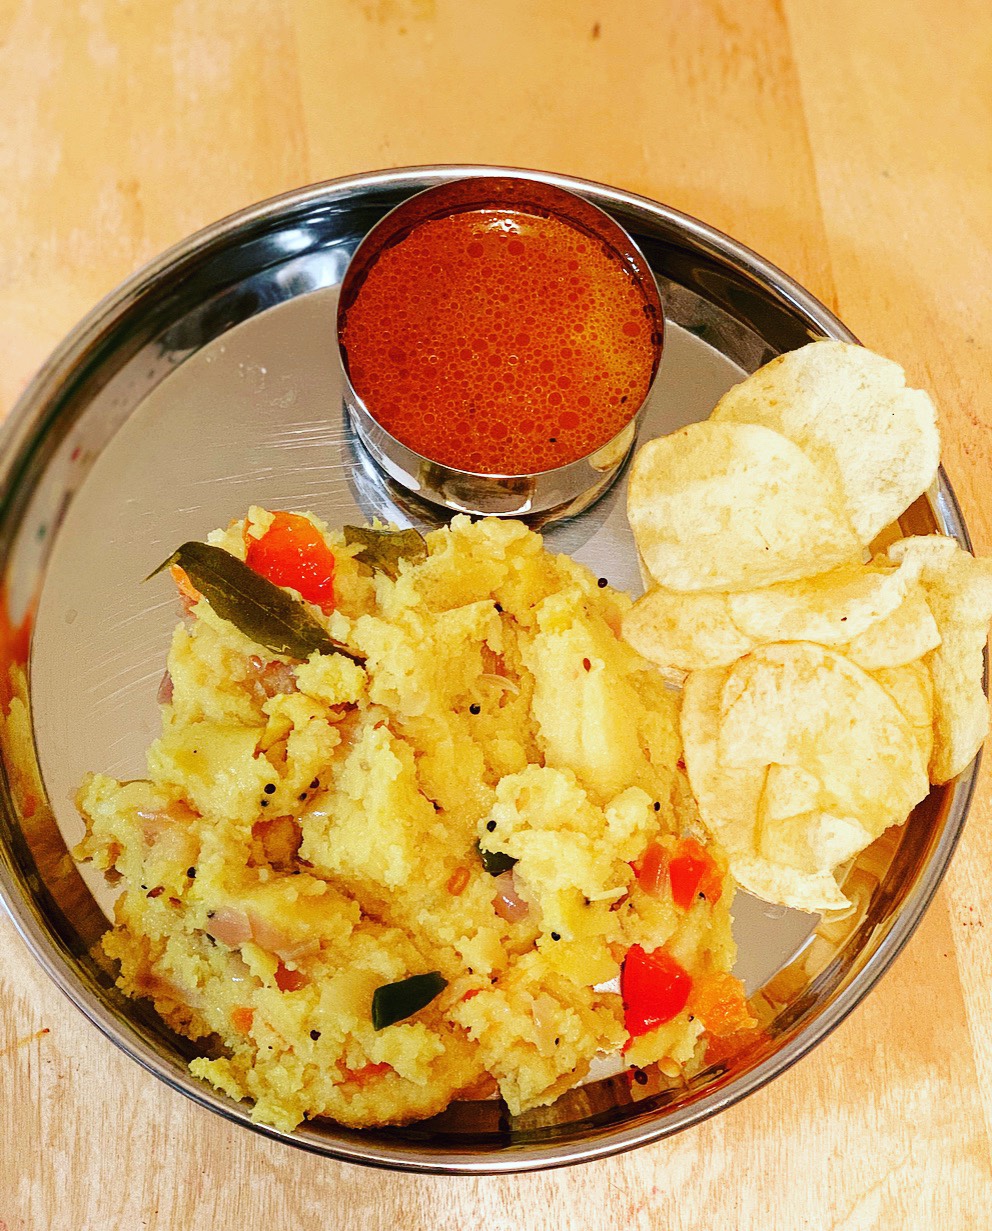
How to make upma: 1. Add oil to a hot pan 2. Next add mustard seed, jeera, asafoetida and curry leaves. Sauté for a min and then add onions. 3. Fry the onion until it turns golden brown. 4. Next add green chillies and chopped tomato. 5. Add pinch of turmeric powder and salt. 6. Let it cook for 5 mins. 7. Add required amount of water, for one cup I added 2 glasses of water. You can add 2-3 glasses of water for one cup rava. 8. Allow it to boil and bring the water to a rolling boil. 9. Set the flame to medium. 10. With one hand pour the roasted rava in the boiling water while you stir the water with the other hand. 11. Stir everything once to check it any lumps. Break if any. 12. Cover the lid and cook for 2-4 minutes. 13. Switch off the flame and allow it to cool down and it’s ready to serve n eat !! I had tomato kulambu gravy which was made for lunch menu so I kept that as side dish. You can make coconut, peanut chutney if you wish. Of course, my husband is a chips lover so potato chips !! 🥰
Notes : 1. Roast the rava in low flame don’t over roast it 2. Add one spoon ghee along with oil and also add extra oil so that the rava don’t stick each other instead it will be in good consistency 3. It goes well with coconut and peanut chutney.
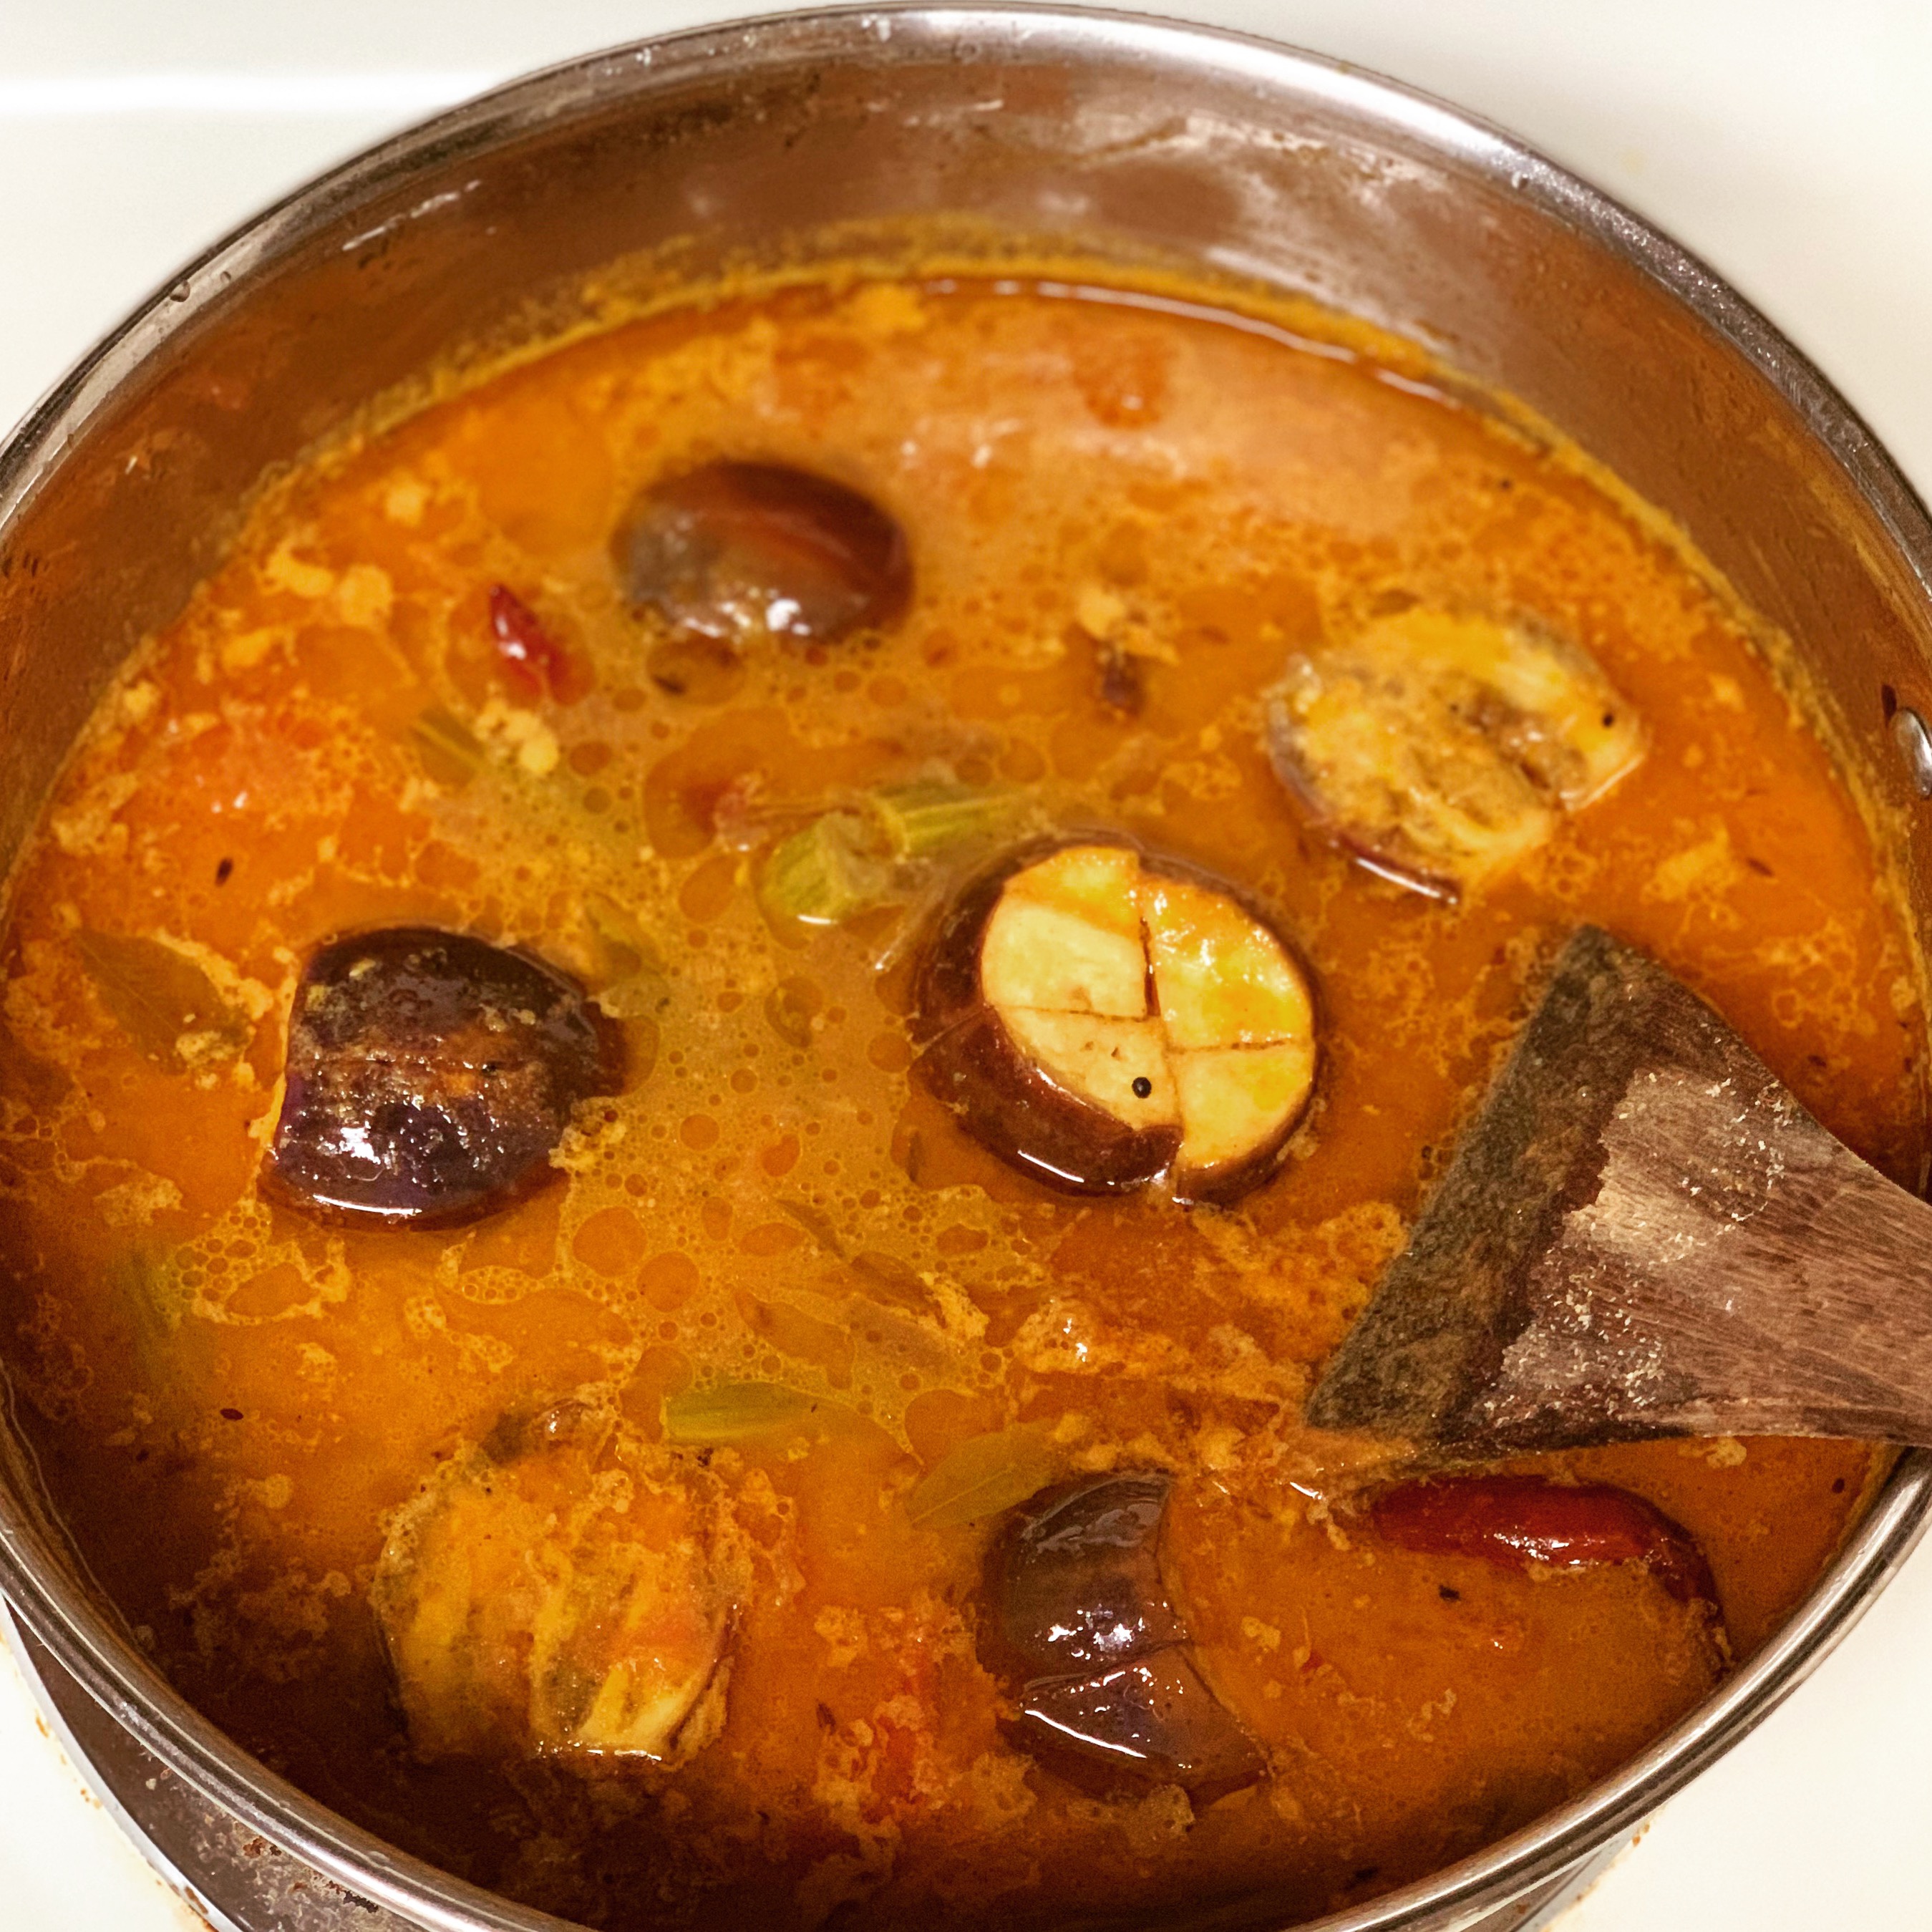
Introduction: Kathirikkai Kara Kuzhambu is famous south Indian tangy recipe for rice and side dish for tiffin. Brinjal lovers, will like this recipe very much. My dad’s favorite vegetable is Brinjal! Often, my mom used to make kathirikkai Kuzhambu. I learned this recipe from my mom. She makes it in a simple way. Easy and quick bachelors style Kuzhambu !!
Instructions: 1. Soak tamarind in 1 cup of warm water for 30 minutes. Squeeze the tamarind, extract the tamarind water and discard the pulp.
2. Chop onion, tomato and garlic. Keep all veggies and thalipu items ready.
3. Heat a pan and add sesame oil. Add mustard, jeera seed, curry leaves, garlic, red chilly. Add chopped onion and turmeric powder. Allow it to cook for 5 mins until it turns golden brown.
4. Add chopped tomatoes and salt to taste. Both onion and tomatoes should be cooked well, which gives creamy texture to the gravy. Mix the chopped Brinjal in to the pan and let it all cook for 5 mins.
5. Add the tamarind water now and chilly powder. Cook for 5 mins. Brinjal gets cooked by now. It’s ready to serve now and switch off the flame now.
Notes: 1. Make sure to soak tamarind well before you cook the gravy. Because it needs to be soaked atleast 30 mins before the start time. It will be easy to squeeze the tamarind water from pulp.
2. Along with Brinjal, you can also add drumstick, potato or just garlic alone and make the recipe. Other methods are same.
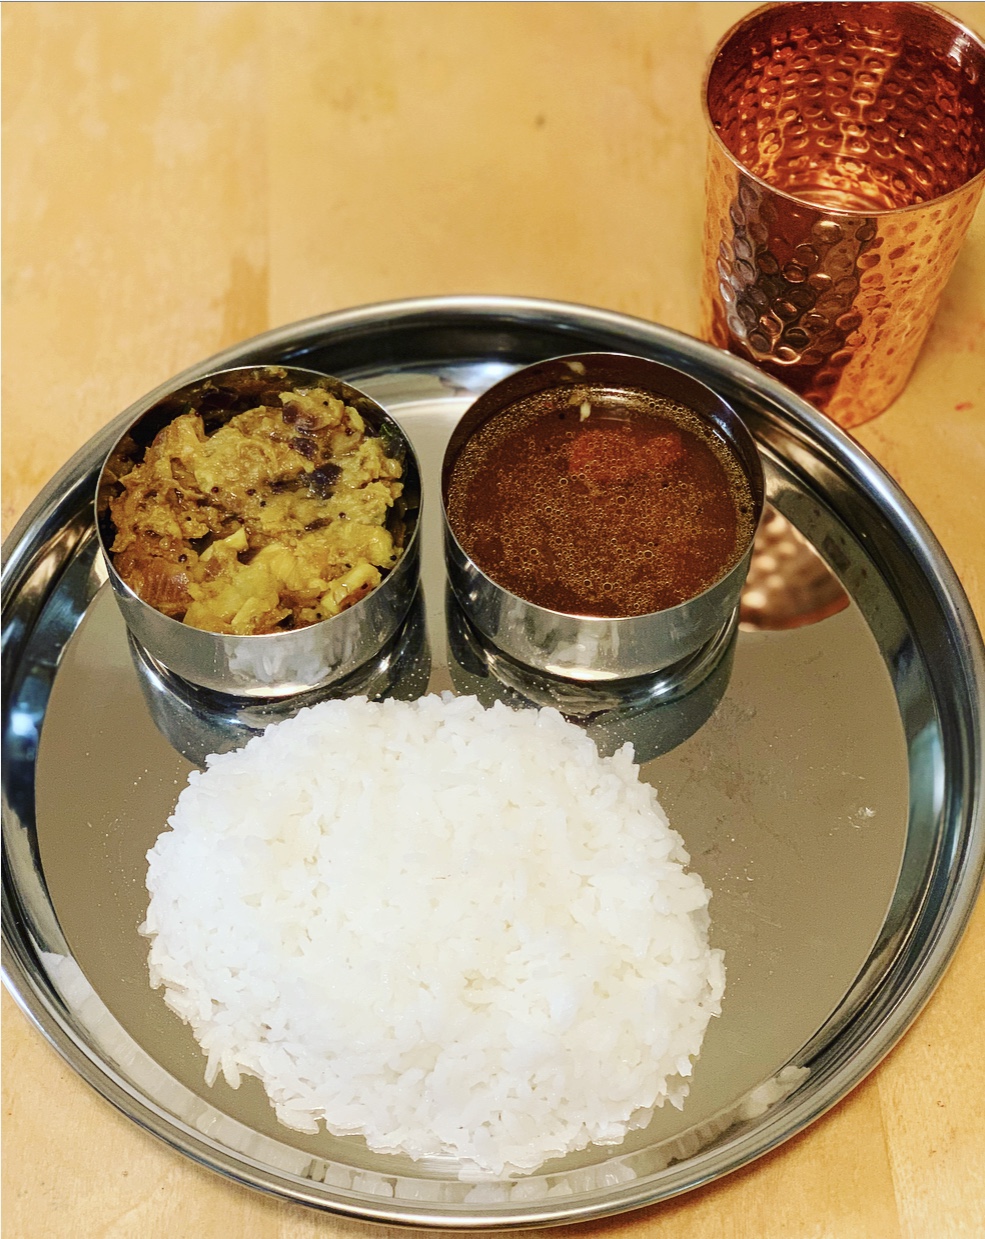
Lunch menu: After Diwali pot luck, so much food we wanted to have some comforting food. We had a simple lunch menu made with Senai, rice and hot Rasam. We completely enjoyed the simple lunch. It’s a heavenly combo of having Rasam with streamed rice along with some variety of Kizhangu’s. You can try masiyal with potato, sweet potato as well. Ingredients will be the same. Senai, is highly rich in potassium.
Ingredients : Senai Kizhangu Masiyal recipe
Senai Kizhangu – 1 cup (pre-boiled)
Medium sized cut onion – 1
Chopped garlic – handful
Curry leaf – handful
Jeera – 1 tablespoon
Mustard seed – 1 tablespoon
Chilly powder – 1 tablespoon
Salt to taste
Instructions: Heat a pan with oil. Add mustard seed, jeera and fry onion until it turns to golden brown. Add chopped garlic and curry leaf. Allow them to cook well for 5 mins. Add salt and chilly powder. Then add boiled and mashed senai Kizhangu. Mix well and cook for 5 mins. It’s ready to serve !!
Rasam : Magic recipe to have a happy tummy! Each home have their own way of making Rasam. We used to make Rasam Podi and stock it for 1-2 months. I will add the Rasam Podi recipe separately. Today, we will see how to make basic Rasam with homemade Podi.
Instructions : Take one glass of water in a bowl and soak the listed items for 30 mins. So that the tamarind gets mixed up well in water. Heat a pan and add oil. Add mustard seed, jeera, asafoetida, red chilly, garlic and curry leaf. Pour the soaked items and add salt to it. Allow them to boil for 10 mins and garnish with coriander leaf.
White Rice : Boil one cup rice in hot water and add one spoon salt. Allow the rice to cook for 15 mins. Filter the water and it’s ready to serve piping hot in a plate !!!
Notes: 1. Boil the Senai Kizhangu in pressure cooker or instant pot so that it gets into mashy consistency. Pressure cooker time – upto 3 vessels. Instant pot – Pressure Cook time – 12 mins (natural release). Mashy consistency is the key to make any kind of masiyal.
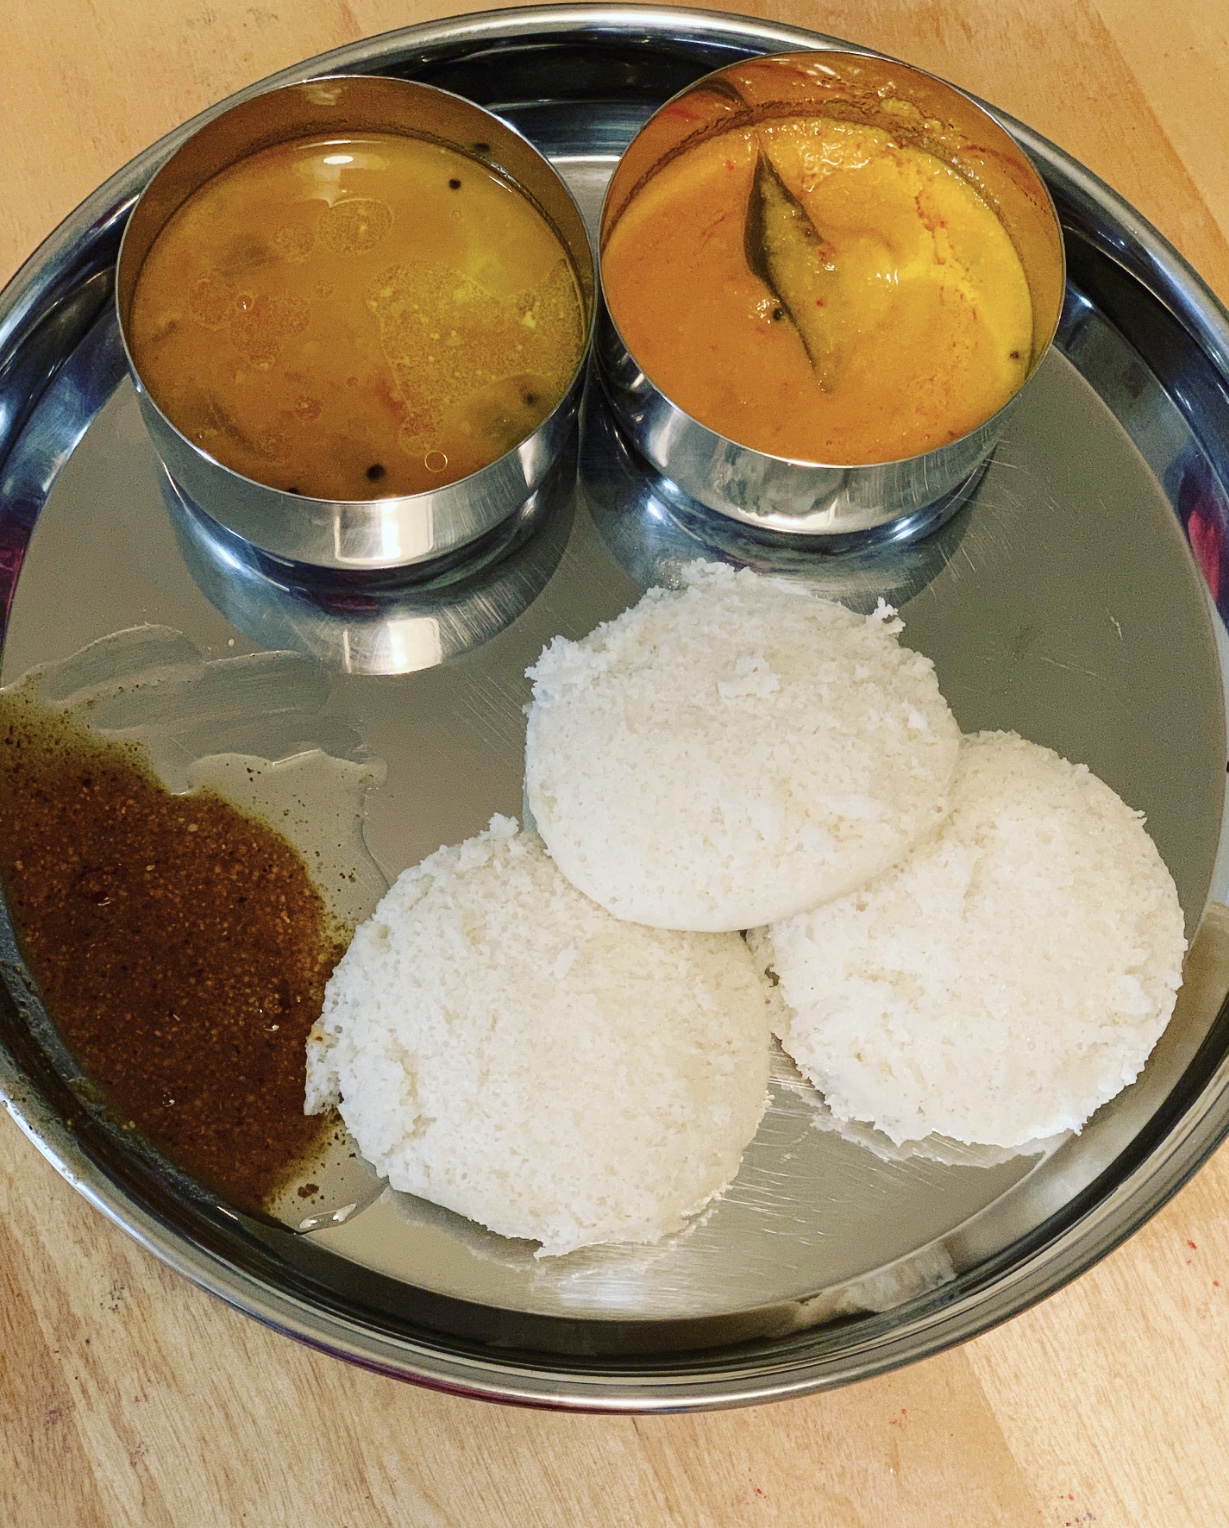
Idli, is a traditional breakfast in many South Indian Households. Idli is basically a ‘Steamed Rice Cake’ prepared with fermented batter of Rice and Urad Dal. It is also one of the food that I grew up having. Come any day at my mom’s place and you will be served with Idli’s or Dosa’s for breakfast, except for Sunday’s where we prefer Eggs omelette.These Idli’s are soft and fluffy like a cotton ball and are best served with a variety of Chutney/Dip and Sambar (Lentil-Veg Curry). Idli Podi, is a flavorful south Indian condiment made out of lentils and spices. It’s home made and can be sprinkled in plain dosas to make it more delicious as ‘Masala Podi dosa’. My husband like it, so I will stock it on regular basis. It can also be used as an ‘Emergency Savior’ at home when you have not made any side dish recipe.
I am here to share the traditional South Indian breakfast recipe which I have learned from my mom. I love my Mom’s idlies. After coming to USA, I miss my mom’s authentic recipes. Trying to cook better day by day and get that heavenly touch in cooking !
Ingredients: Soak in water for 4 hours
1 1/2 cup Idli rice
1 cup urad dhal
2 tablespoon fenugreek seed
Instructions:
Soak the idli rice and urad dhal separately in two bowls for 4 to 6 hours. Add fenugreek seeds along with idli rice. When you start grinding, start with urad dhal. The texture of idli is totally based on the grinding part. Slowly add water and grind the urad dhal until it doubles up in volume. You will notice it and it’s a good sign to have the batter in right way. Once the urad dhal is grinded completely, start with idli rice. Some of them use normal rice for making the batter. Lot of people ask whether can we use normal rice which we use for making white rice at home. The answer is yes you can use it’s totally up to the individuals. But, when you use the idli rice it definitely makes the difference. I prefer idli rice. Once you complete grinding the rice, mix the batter well and add salt to it. Close the lid tightly. Store it outside for one night and the batter gets fermented the next day morning. Ready to make idlies and Dosa.
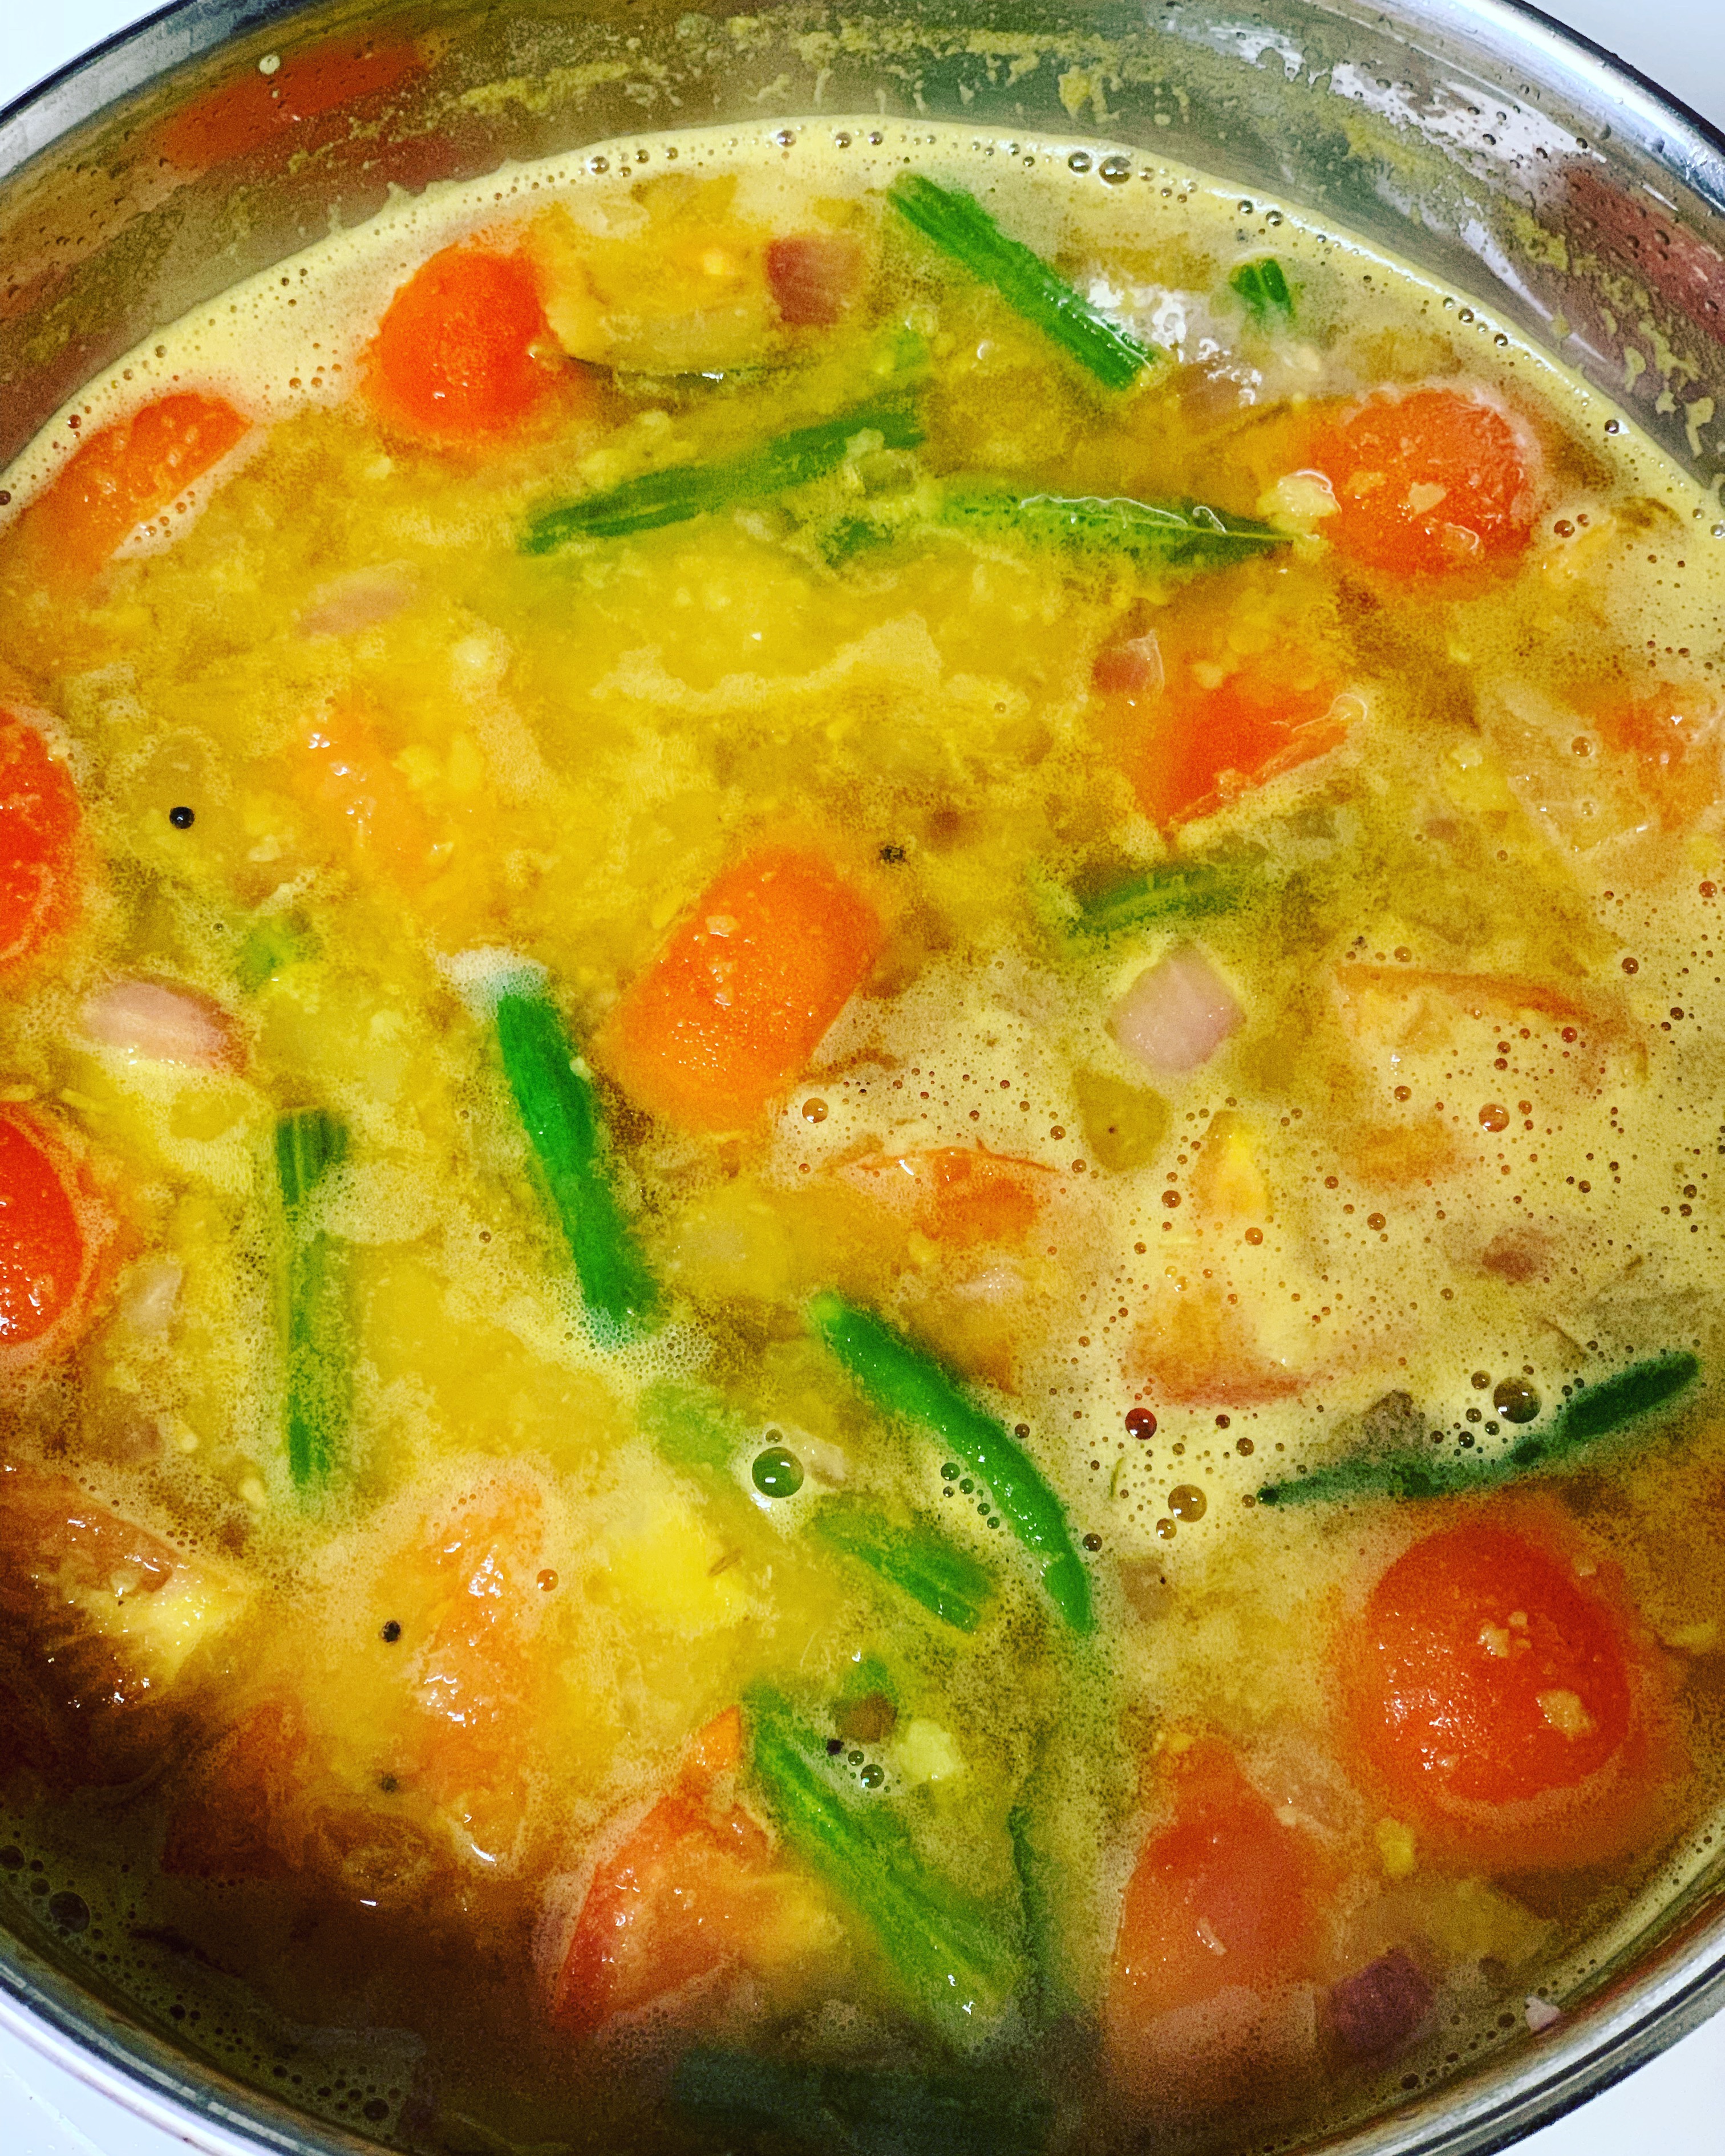
Drumstick Sambar : Drumstick Sambar is also known as ‘Murungakkai Sambar’ in Tamil cuisine. Sambar is the most instant side dish recipe popular in south India. The aroma of melting ghee along the Sambar will make any one and everyone mouth watery. It can be served with idli, Dosa, pongal, vadai, upma and white rice. No marriage halls are without the smell of Sambar. Such a healthy protein rich recipe! Once I read an article on balanced diet, it says when the school going kids are feeded with idli and Sambar in the morning before going to school they have complete concentration throughout the day. The protein in the dhal makes it all way. The brain functions well for proper concentration. Parents make a note!! Then I realized the reason why my mom gave me idlies all time for breakfast especially before my exam times. Our tradition have everything framed and structured according to the Mother Nature. It takes time for adults to realize the facts behind everything!!! Those days I used to curse my mom for giving me idlies and now I realize for it ! Thank you mom!
Instructions: Recently, I used to pressure cook the dhal using my instant pot. If you have instant pot, then pressure cook the dhal in the pot for 20 mins and make the gravy. You can also use normal pressure cooker which is the traditional way of making dhal . Add toor dhal, turmeric powder, asafoetida, jeera, fenugreek seed in cooker. Add one glass of water and boil it for 25 mins. Meanwhile, keep all veggies ready. Add oil in a pan, do thallipu (mustard seed, jeera, curry leaf). Mix onion and allow them to fry well, add green chilly, tomatoes, drumstick. Allow them to cook. Add salt and Sambhar Podi. Add tamarind water and allow them to boil for 5 mins. Once the dhal is ready, mix it with veggies and tamarind water. Finally, garnish with coriander leaf.
Idly Podi : How to make homemade idly Podi. It can be served with Dosa and idlies.
Ingredients:
Urad dhal – 1cup
Red Chilly – 15
Asafoetida – 3 tablespoon, salt to taste.
Instructions: Add oil in a pan and fry red chilly mildly and keep it aside. Add oil and fry urad dhal for 15 mins until it turns light red. Add asafoetida and salt. Grind them in powder consistency and ready to serve for idly and dosas. You can grind them in mixer. It can be stored in an air tight container.
Capsicum Chutney: This capsicum chutney is introduced to me from my sister in Chicago. In USA, bell peppers are easily available. Once I went to her place, she made this Chutney for dinner along with kal dosa. That was the first time I had it. It tasted so good to my taste buds and from then on I used to make it at home as well.
Method: I have tried this recipe only with yellow bell pepper. I like the taste of yellow bell pepper. If you want to try with red, orange or green you can do it. Add oil in a pan and fry onion, red chilly, garlic, Capsicum, tomato, tamarind. Allow them to fry for 5 mins. Add peanut and grated coconut and grind them. Add salt and do thallipu (mustard seed and curry leaf).
Notes: 1. When you soak urad dhal in water, you will notice the yeast formation. Just keep it aside do not filter the water. The yeast which is formed after you add water will make the dhal turns out to be the better batter when you grind it. 2. While making sambar, cook the toor dhal well and mash it completely which gives good sambar. Don’t forget to add pinch of fenugreek seed when you cook the dhal. It gives cooling effect to the body. 3. The creamy texture of capsicum chutney comes from the secret ingredient ‘handful of peanut’. Do add it!